Saturday, July 11, 2009

Simple Fixes for SD "Memory Card Locked" or "Memory Card Error"

(Last update February 13, 2014)
If this information helps you, please pay it forward, and share this article with others who may be experiencing the same problem.   Your help in sharing will be appreciated, and karma will prevail!

For those attempting to recover lost or accidentally deleted photos or videossee this linked article instead. For those who've simply forgotten their card's password, scroll down to the bottom of this current article.  For those that have taken many previous photos with the card, but suddenly your camera or computer wishes to "format" the card, see the "corrupted card procedures" located near the bottom of this linked article instead.  For those with Compact Flash (CF) cards, please see this article instead.   Finally, for those that are still here with SD card problems, please continue reading.

First of all, here's a video summary of the steps.  But please remember to also read each of the Fixes listed in the article, along with user comments as they contain additional tips that the video doesn't cover.
Video: SD Card Problems and Fixes

FIX 1: I know that you probably already have checked the card's slide switch, but I just want to first present this for others with the same problem who may not be aware of this switch. Other options besides the slide switch are presented further in this article.

Please check to make sure that you didn't accidentally place the tiny locking slide switch on the side of your SD card in the "locked" downward position. The correct "unlocked" position should be slid up toward the direction of the connectors. If you discover that the locking switch is actually missing or has broken off, proceed directly below to Fix #4a.

Card Switch in Downward "Locked" Position
(note the arrow by the word "Lock")SD CARD LOCK
Card Switch in Up "Unlocked" PositionSD CARD LOCK FIX


FIX 2: Old cameras and the card readers on older computers just can't read 4GB or higher SDHC cards.  If this problem is just happening after purchasing a brand new card, AND your camera is an older camera (about 2008 or older), I'm going to guess that you just bought a new 4GB or larger SDHC card. If the above is true, continue reading. If not true, skip to Fix 3.

Although the SDHC card looks exactly the same as a standard SD card, the format the card uses is very different. Unfortunately your older camera was likely designed before the SDHC format came out. Sorry, but a SDHC card may not work with your older camera (check your camera maker's website for your model). You probably will need to use standard SD cards only (usually those 2GB or less). They're relatively inexpensive these days, and can easily be found on Amazon if your local store doesn't carry less than 4GB cards.

SDHC Card (Left) vs. Standard SD Card (Right)
SD SDHC DIFFERENCE
FIX 3: If you've had the card for a while, but it just recently started to show "memory card error" or "card requires formatting", ask yourself if you can ever remember formatting your card IN THE CAMERA. If you can't remember doing such (or don't know what a format is) continue reading. But if the description above doesn't apply to you, skip to Fix 4.

An unformatted card will initially work fine in a camera, but eventually will corrupt with time, especially after many files have been saved and deleted. A card can also corrupt if camera power is interrupted during the write process (such as changing batteries or batteries dying while the card is still writing the last picture taken). Formatting the card in the camera will correct both these problems, BUT it will also erase all photos on the card. AFTER you've recovered any important photos (please see this other article from this blog that shows how to recover your photos from a corrupted card), format the card in your camera to prevent this from happening again (dig out your instruction manual to figure out how). Stating this once again, formatting will also totally erase your card, so only do this after you've recovered and saved to your computer any important photos from the card.

FIX 3A: If file corruptions are occurring occassionally or intermittently (such as for every few files or movies taken, the camera states "file unrecognized" or something similar), take a close look at your card to determine its "Class", or in other words its write speed. Written on the face of the card should be the word Class with a number, or a number circled with a capital "C". See the above photo for an example of a Class 6 card (on the left), with an older/slower unmarked card on the right. If neither "Class" or "C" is written, the card is likely Class 2 or lower. Today's newer cameras take very high-resolution pictures, AND high-definition videos. File sizes can be very large. Some of the older SD cards just cannot keep up with the write speed required to save these files before you're ready to take another picture. As a result, some of your files can become corrupted if you're using older cards with newer cameras. The fix in this case is to purchase a higher speed card for your newer high-performance camera (recommend Class 6 or better). Or you can also wait a few seconds between shots/videos before switching modes or taking another picture (to ensure the write is completed), but that can get to be annoying after a while.

FIX 3B: Again, if file corruptions occur intermittently, AND you use a card reader, do you remove the card properly from the reader?  When ejecting a memory card from its reader, recommend that you always select the "Safely Remove Hardware and Eject Media".  This selection is located in the bar in the lower right-hand corner of your computer screen (if using a PC).  

FIX 4: The famous "toothpick" fix (first presented here on DIY Digital Camera Repair). If you've tried the above techniques, and it's still showing locked, it's likely that the locking switch inside the camera's card slot is stuck. If you look inside the slot on the side of the slot where the SD card slide switch would be, you'll see a glint of gold color on the side. This is the camera's lock/unlock switch. The other glint's of gold that you may see at the far end of the slot are the reader's connectors (ignore those).
Camera's SD Card Lock/Unlock SwitchSD CARD LOCK FIX
Somehow, the locking switch is making contact and has become stuck in the locked position (a single grain of sand can jam it there). With a plastic toothpick, or other skinny NON-METALLIC item, tap and gently push against this switch to see if you can jar open the contact to its normal unlocked position. Also try blowing compressed air at it, to clear out any gunk that may have worked its way in there, jamming it closed. Occasionally, reinsert the SD card to see if the issue has been corrected.

Fix 4A: The famous "tape" fix (sorry, I can't claim this one). If none of the above seems to work, or if you've found that you've broken the locking tab on the card, one final thing to try before opening the camera is good old tape. Cut a tiny piece of clear cellophane tape (use scissors to trim it), and place it tightly over the slot where the locking switch is, or was. I can't stress it enough, keep the piece of tape small, you don't want to jam your card in the camera. Now slide the card into the camera. If you encounter any resistance, STOP, the tape is likely too thick or too much. But if not, proceed and see if that corrects the problem.
Taped Locking Tab Slot
SD CARD TAPE FIX
SD CARD TAPE FIX

FIX 5: If you've come this far and you're still getting a "card locked" error, it may be time to consider opening the camera to force open this switch, or to inspect its wiring (not recommended unless you have some familiarity with electronics). In this case please see this blog article instead (xscrewdriver, hope you don't mind me referencing your blog).


LOST PASSWORDS FIXES


Forgotten passwords can be recovered using the following procedures (from kioskea.net).

Lost Password Fix One:
1. Open the file manager of your mobile
2. In Settings choose system folders,
3. In the System folder, find a file called mmcstore
4. Send the file to your PC using IR/Bluetooth
5. Open the file in Notepad
6. The password you need for your memory card is located within that file


Lost Password Fix Two:
1. Insert your card into your phone, without accessing it through the phone
2. Run FExplorer and Open the path C:\system
3. Find the file called mmcstore, and rename it mmcstore.txt
4. Copy that file (mmcstore.txt) to your PC and open it in Notepad
5. Your password will be located within that file.

For Nokia Users with MicroSD : 
Put the card in any E series mobile or N95 etc and format it. It will not ask for a password.

Thursday, June 11, 2009

Fixing a Compact Flash Memory Card Error

Note: owners of Canon PowerShot S400 cameras, please see this first (you just might get this problem fixed for free!).

For all others, Oh No! Your favorite compact flash camera all of a sudden has started giving you CF memory card errors. You've tried several different memory cards, and it's still the same thing. Your camera is inoperative due to this error. Don't fret, you just might be able to fix this problem yourself.

Take a look inside your camera's CF card slot. It's very likely that you may have a bent pin in there. If so, remove batteries and card. Use a small/skinny jeweler's flat screwdriver to bend the pin back as close as possible. The jeweler's screwdrivers that you see at the dollar store will work fine. Another tool that I sometimes use is a stiff wire with a bent hook on the end to get very flattened pins started. Take your time and use as much patience as you can muster (take a breather in between if needed). Just keep nudging it upward/straighter a "tiny bit at a time". Whatever you do, don't try to unbend it with one push/nudge, you won't be able to do it.

It doesn't have to be perfect, just as close as you can get it. When it's the best that you can get it, take your flash card and "SLOWLY" insert it. The card itself should fine-align the pin. Remove the card, and verify that the pin is still straightened. If so, reinsert the card and try it out.

Saturday, May 30, 2009

A Simple Fix for a Stuck Shutter

For those of you owning Canon A400 series (A400 through A490), please see this link after trying the below troubleshooting steps, as you may also be experiencing a broken shutter ribbon cable.
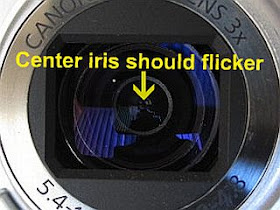
A stuck shutter is a common failure mode for digital cameras. Unfortunately some model cameras experience this more than others. I won't say which but you'll likely notice in the comments section which cameras these are. The symptoms of a stuck or "sticky" shutter are very similar to CCD image sensor failure. The camera may take black pictures (for shutter stuck closed), or the pictures may be very bright and overexposed, especially when taken outdoors (for shutter stuck open). To confirm a stuck shutter, put the camera in any mode other than "Auto", and turn the flash OFF (you don't want to blind yourself for the next step). Next look down the lens and take a picture. You should see a tiny flicker in the center of the lens as the shutter opens and closes. If no movement is seen, then you likely have a stuck shutter.

If you did see movement, then you are possibly experiencing CCD image sensor failure. As mentioned, the symptoms of a stuck shutter are very similar to CCD failure. If you own a Canon or Sony camera, please see the following two articles instead as your camera might possibly be eligible for free repair:

Canon CCD advisory article

Sony CCD advisory article

Unfortunately, actual mechanical repair of a stuck shutter is labor intensive as the mechanism is buried deep inside your camera. If the camera is out of warranty the cost of this repair is usually very high, and may be more than the value of the camera. Would not recommend trying to open your cameras to repair this yourself, as it's very unlikely that you'll succeed. However, there is something simple that you can try that might unstick it, albeit it may be only a temporary fix. Also would not recommend that you do this on a perfectly working camera, as I'm not sure what the power interuptions may do to the camera. As usual, only think of doing this procedure as a last resort for a camera that repair cost is out of the question, and as such the camera would otherwise be set for disposal:

Step 1. Turn the camera on. Also turn off any features that may be a power drain to the batteries. You want all available power from the batteries for the following steps. Turn off image stabilization if your camera has that feature. Put the camera in any mode other than Auto, and turn off the flash. Also turn off the LCD screen (press the DISP or DISPLAY button).

Step 2. Move the camera to any mode that will give you the longest exposure time without flash. For many Canon cameras this will be shutter priority (Tv) mode (for many Canon A models the wheel with AUTO,M,Tv,...). For some of the Canon SD models this is also known as "Long Shutter Mode" (select the Moon/Stars icon).
For cameras other than Canon, set the camera so that it will take the longest possible exposure, usually 15 seconds (15"). Many cameras may not have shutter priority mode (Tv). Instead, put the camera in manual mode and turn off the flash. With these settings, try the fix in a darkened room, opening the battery door immediately after taking the picture. The darkened room without flash should give you a prolonged exposure, hopefully giving you enough time to conduct Step 4 while the shutter is trying to move.

Step 3. Take a picture.

Step 4. After 7 seconds open the battery door for a few seconds and then close it again. The intent is to momentarily interupt power during the exposure time. Note that you may also open the battery door immediately after pressing the shutter button if your camera is not capable of taking 15 second exposures.

Step 5. Repeat the procedure until the shutter becomes unstuck. One person reported on Fixya doing this 15 times before his shutter became unstuck.
Supposedly the power interuption while the shutter is trying to open can "jog" the shutter open. Some people have reported success with this method, and they noted that it required many tries.
Step 5a. Alternative Fix (use caution!). Please use common sense and care if you decide to try this technique, as there is some obvious potential for further damaging your camera with this step. If the above five steps don't work after many repeated tries, several readers have reported success in jogging the shutter open by tapping the camera against a wooden surface.
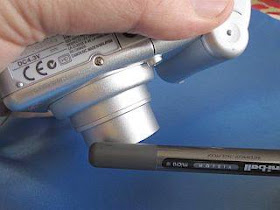
Step 5b. Alternative Fix b. If 5a scares you, others have reported success with an alternate method of merely extending the lens and then gently tapping around the extended lens barrel with a pen or pencil. Every once in a while check down the barrel to see if you notice lens flicker when taking a picture. If none noted, continue tapping. I have personally repaired two different Canon SD1000's by merely gently flicking the end of the lens barrel with the tip of my index finger while taking a picture.
Gently Tapping Around the Extended Lens Barrel


Anonymous reader of July 25th offers two more Steps:
Step 6a: In a very dark room to open the camera's iris, switch back and forth on the selector dial from picture taking mode to playback mode. Keep switching back and forth between modes until the shutter opens. Gently tap on the lens housing with a pencil or pen while conducting these cycles.
Step 6b: Again, in a very dark room, place the camera in shooting mode and then open and close the battery cover. No need to place the camera in Tv mode or set to 15 second exposure. Any shooting mode will do while you open and close the battery door. Keep repeating until the shutter opens. Gently tap on the lens housing with a pencil or pen in between tries.
IMPORTANT, Post-Repair Step: If you succeed in fixing your camera, note that this may also be only a temporary fix, and you may be required to do it again. To minimize this potential, place the camera in "Continuous Shutter" mode, and take a large amount of pictures continuously to attempt to lubricate the shutter (you can delete those pictures later). Also, try to use your camera more often as another preventative measure from reoccurrence.
Note that cameras with shutters that are stuck open (overexposed pics) can be particularly difficult to repair with the above techniques. But I do know that Step 5b can work for both stuck open and stuck closed shutters (of those SD1000's that I've repaired, one was stuck open). Hopefully you'll be lucky too. But if not, it may be time to consider retiring the camera.
Finally, please comment below whether you succeeded or not with this technique along with your camera model. Also note how many tries you gave it. If you know of another method, please also report that here.

Saturday, January 24, 2009

How Do I Download or Upload Pictures or Videos from my Camera?

This question comes up a lot. A new or used camera owner may run into camera software issues. They'll plug in their camera, but for some reason their computer fails to see or recognize the camera. Another problem is they may lose or may never have had the USB cable or needed software that came with the camera. Is there any other way to get the photos or videos off the camera and onto their computer?

First of all keep in mind IMO the only reason that the camera companies include a capability for cable download is to get you accustomed to using their bundled software that came with the camera. In most cases this software is rather pitiful, again IMO. If you absolutely must use photo organizing or editing software, there are much better freeware options available than what came with your camera (a future blog post is brewing).

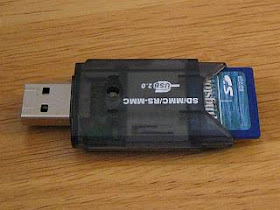
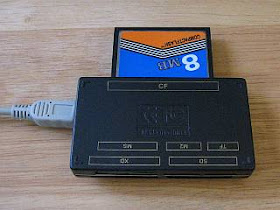
But as a solution to downloading your photos, I highly recommend that you instead consider using a card reader to move the photos or videos to your computer. Card reader's do not require software (although Windows 98 and earlier may require drivers), are very inexpensive, are much faster downloading files from the camera, do not use the camera's batteries during the download, and are much less prone to file corruption of the photos during the download. Really, it would be better for the camera user if one of these was included with the camera instead of the cable and bundled software.

Portable SD Card Reader/Writer

"All in One" Multi-Card Reader/Writer

You place the camera's card in the reader, plug the reader into the USB port, and your computer sees it as a hard drive. You simply copy/paste or drag/drop your photos onto your hard drive. For this simplicity, most professional photographers utilize card readers exclusively. You'll save yourself a lot of heartache if you convert to using one of these.

Here are examples from Amazon. Don't be fooled by the cost. Some of the most inexpensive ones work just fine. But make sure that you do read the reviews first before purchasing. Also make sure that you get a reader that is clearly stated capable of reading your card, particularly if you use SDHC, XD, CF, or MS cards.

For international readers of this blog, and even those in the US, here's another source for card readers (free international shipping too :-). I use the $1.95 portable SD/SDHC card model (SKU7230), and it works great. Note that the free shipping can take up to three weeks though as they're located in Hong Kong.

Now go throw away that cable and go download your photos.