Similar to Canon and Sony, Fuji has also promised to REPAIR FOR FREE its cameras experiencing symptoms of a defective CCD under their recall advisory. You may have to pay for shipping to the repair facility (I would strongly argue reimbursement with them). Some symptoms of a defective CCD include distorted images or abnormal colors, scratchy purple lines, blank or black pictures, and/or black videos with good sound being recorded on the camera's flash card. You may suspect that the camera's shutter is not opening, but this is not the case. Fuji digital still camera models that are affected include:
Advisory Camera Models and Serial Numbers
FinePix A303
Serial Numbers 3JA4**** through 3JA5****
FinePix F410
Serial Numbers 32A1****, 32A6**** through 32A7****, 32A9****
FinePix F700
Serial Numbers 33A0****, 34A1****
Had a little difficulty finding this advisory (makes it seem like they're hiding it hmmmmm? If so, shame on them!), but use the following instructions at the Fuji website: (UPDATE September 6, 2008: It seems that FUJI has abandoned their repair of these defective camera as the following link no longer works. DOUBLE shame on them!!!)
(Last Update: 13 February, 2014) If this information helps you, please pay it forward, and share this article with others who may be experiencing the same problem. Your help in sharing will be appreciated, and karma will prevail!
This has to be THE most common failure mode for a digital camera, a stuck lens, jammed lens, or a malfunctioning lens. Some common error messages that might show up on the LCD's of cameras with this problem include “E18 lens error” (older Canon Powershot), "ACCESS" error (Sony Cybershot), "Zoom Error" (Fuji Finepix), "Lens Obstructed" (Kodak Easyshare), “lens error, restart camera” or just "lens error" (Nikon Coolpix and some other camera makers lately are using this variation). Some cameras might show nothing at all, but merely make a beeping noise as the lens goes out, then in, then the camera shuts off. Sometimes the lens won't even move.
The problem is actually quite common throughout all camera brands. Usually it's sand or grit interfering with the lens extension mechanism. Or the camera's been dropped with the lens extended. Or the camera has been powered on, but the lens had been blocked preventing its extension. Or the battery ran down with the lens extended. Believe it or not, one BIG contributor to lens errors is using a camera case. Sand, gunk, case fibers, etc... accumulate at the bottom of the case. These materials love to cling to the camera by electrostatic build-up from the camera rubbing against the side of the case (especially those cases with soft fibrous intreriors). Once these materials work their way into the lens mechanism, that's all she wrote. I have many Canon's, and NEVER use a case for this very reason.
Note that this problem applies to ALL cameras with telescopic lens barrel (optical) zoom. With Samsung's release of the Galaxy S4 Zoom, I'm really curious to see if this will also be a issue/problem with this camera phone (and other phones with optical zoom). I predict (on June 16, 2013) that it will, as most people carry their phones in pockets and purses. If it occurs, Fix 5a would likely be the best technique to correct this problem.
A camera owner that suffers this problem may have no recourse for having the camera repaired. Many camera makers will not honor repairing this problem under warranty as they claim it is due to impact damage to the camera, or sand or debris getting into the lens gearing mechanism (neither of which is covered under warranty). The quoted repair cost is usually close to or more than what the camera is actually worth.
Fortunately, about half the cameras that suffer this failure can easily be fixed by one of the following methods. None of these methods involve opening the camera, although some have potential to cause other damage to the camera if excessively done. If the camera is still under warranty, before trying any of these, please please first contact your camera's maker to see if they'll cover the repair, or to determine how much they'll charge for the repair. Who knows, you might get lucky. But if they quote you a number that's higher than the value of your camera, you may want to consider the following methods.
First here's a video summary of most of these fixes, and following that a detailed text description of the fixes. Recommend reading the text first (along with the reader's comments and tips section) as these provide additional tips for situations that the video does not. For example, the video focuses on repair fixes for a camera that does not have obvious damage to the lens barrel (such as from a fall). Thus it does not cover straightening the lens barrel if it is crooked, which the text does. Use the video primarily for further clarification on how to conduct these fixes if you have questions.
Video Summary Fixes 1 through 7
The methods are listed in the order of risk of damaging your camera. Thus make sure you try them in the listed order. And remember, these fixes (especially #6 and 7) should only be considered for a camera that's out of warranty, who's cost of repair would be excessive, and would otherwise be considered for disposal if unrepaired:
Fix #1: Remove the batteries from the camera, wait a few minutes. Put a fresh set of batteries back in (preferably rechargeable NiMH 2500mah or better) and turn the camera on. If using rechargeables, and they're more than a year old, consider purchasing new rechargeable batteries as they may not be providing sufficient power to startup the camera.
Fix #1a: If new batteries didn't work, try pressing and holding the Menu, Function, Function Set, or OK button while turning the camera on. This along with Fix #1c and #2 sometimes work for lens errors that occur from batteries wearing down while the lens was extended.
Fix #1c: For those of you who can still access your camera's menus with this error, try finding and selecting the "factory reset" option to set your camera back to its original factory condition. On some Canon cameras, this requires holding the menu button down with the camera powered on for up to 10 seconds. However note that a lens error might sometimes override the reset option, and thus the option might not appear.
Fix #2: If the camera's batteries ran down completely while its lens was still open, the camera may show a lens error or not start properly when new batteries are installed. Remove the memory card and keep it removed, then install the new batteries. When you turn the camera on with the card removed it may come back to life, as this triggers a reset in some cameras. Error E30 (for older Canon's) means that you don't have a memory card installed, so turn it off, slip in the SD card and turn it on one last time
Fix #3:Insert the cameras Audio/Video (AV) cable, and turn the camera on. Inserting this cable ensures that the camera's LCD screen remains off during the start process. Thus extra battery power is available to the camera's lens motor during startup. This extra power can be useful in overcoming grit or sand particals that may be jamming the lens. If the AV cable doesn't fix the lens error by itself, consider keeping this cable installed while trying fixes 4, 5, and 7 as a means to provide extra power to help to these fixes. But note that I DON'T recommend keeping the cable installed during Fix 6 as you may damage the AV port while tapping the camera. Reinsert the cable only AFTER tapping the camera.
Fix #4:Place the camera flat on its back on a table, pointed at the ceiling. Press and hold the shutter button down, and at the same time press the power-on button. The idea is that the camera will try to autofocus while the lens is extending, hopefully seating the lens barrel guide pins back into their slots.
Fix #5:Blow compressed air in the gaps around the lens barrels with the idea of blowing out any sand or grit that may be in there jamming the lens. Other variations include blowing with a hair dryer in “no heat” setting, or sucking the gaps with a vacuum (careful with this one). Some people also have actually used a "Shop Vac" with this fix to help extend a retracted lens.
Now we're entering into the realm of potentially damaging your camera in conducting the fix. There is definitely some risk here, so take care when conducting the following fixes:
Fix #5a: If you actually do notice sand particles stuck in the gaps around the lens barrel, and blowing air does not help to dislodge them, consider using a thin piece of paper or a sewing needle to help dislodge them. Pay particular care not to scratch your lens barrel with the needle. Also, I do not recommend probing too deeply around the lens barrel with the paper (don't go more than a 1 cm or 1/2 in) . Particularly I do not recommend probing deeply around the most outer (largest) lens barrel gap, as you may dislodge the lens barrel dust gasket that's located just inside of that gap.
Dislodging Particles from Lens Barrel Gaps (Fix #5a)
Fix #6: Repeatedly tap the padded/rubber usb cover on a hard surface with the intent of dislodging any particles that may be jamming the lens. Other variations include hitting a side of the camera against the palm of your hand. A lot of people have reported success with this method. HOWEVER, there is also some obvious potential for damaging or dislodging internal components with this method, such as unseating ribbon cables, or cracking LCD screens.
Fix #6a: This is a variation of Fix #6, and should be tried if the lens barrels appears straight (not crooked). In other words, try this if there's no obvious mechanical damage to the lens barrels that's causing the problem. With the lens pointed down, try "gently" tapping around the lens barrels with a small item such as a pen or pencil. The idea is to try to dislodge any sand particles that may be jamming the lens barrel stuck. Simultaneously try turning the camera on and off as you're doing this.
Dislodging Particles by Tapping (Fix #6a)
Fix #7a: Note that this particular fix is intended only for cameras with lens barrels that try to extend, but then stop partway, and then return to their stored position. Try grabbing and holding the smallest inner lens barrel at its furthest extended position, preventing it from returning to the camera. Examine and clean around the lens barrel any noticed dust or dirt. Turn off and restart the camera again. If the lens extends even further, grab it again at its furthest extension, preventing it from returning. Clean again. Keep repeating until the lens is fully extended. Turn off the camera and restart it to see if the lens error has gone away.
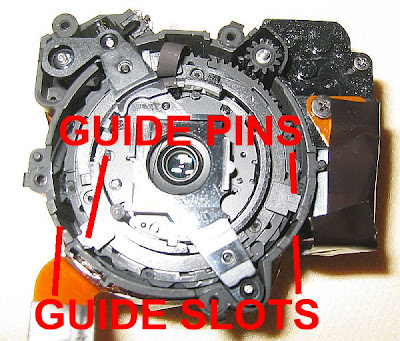
Fix #7b: The most extreme of the fixes. Only consider this fix as an absolute last resort before tossing the camera, as there's some obvious potential for further damaging your camera by using this method. You especially might consider this if the lens barrel appears obviously damaged, bent, or crooked such as from a fall. In that case, try thinking of the lens as a dislocated shoulder. Try forcing the lens to straighten it and put it back in its place. In such cases, the lens barrel guide pins have become unseated from their guide slots (see the below illustration). Your objective would be to try to reseat them by straightening the lens. Listen for a "click" to hint that they've been reseated, and immediately stop forcing the lens at this point. More people have reported success with this method than with any of the other methods (see the polls in the right column).
Variations to Fix #7b include gently pulling, rotating, and/or twisting the lens barrel while hitting the power button. Examine the lens barrels closely for any hint of tilt or unevenness. Again, the goal is to attempt to straighten or align the barrel if it's crooked or twisted. Another variation includes looking for uneven gaps around the lens barrel, and then pushing on the side of the lens barrel that has the largest gap (note pushing the lens barrel all the way in is NOT recommended as it may become stuck there). Again, while doing any of the above, listen for a click that indicates that the lens barrel guide pins may have reseated in their guide slots. If you hear this click, immediately stop and try the camera. The following photo illustrates unseated guide pins that would cause a lens error.
If you try these fixes, please vote or post a comment on how the fixes worked for you. Your experience may help others. Note that most of the fixes listed here actually come from my reader's comments. If the above fixes didn't work for you, then please read through the reader's comments, especially the newer ones. There are other techniques listed from readers there that just might work for your situation. When posting a comment, please specify your camera model, and the particular fix that worked. Please also comment if none of the fixes were successful, or if you tried something different that worked.
References:
Canon E18 Lens Error – This is the big kahuna of all E18 error camera repair sites:
Make sure you also read their post section to hear of other peoples successes and failure in fixing this problem:
More Canon E18 experiences and fixes at The Juggle Zone.
The E18 Error Experience Log. Even more Canon E18 experiences, plus a good listing of E18 errors by Canon model:
Nikon Coolpix L3 Lens Error - This site has a few other fixes not listed here that are applicable to the Nikon Coolpix cameras:
Jancology.com Nikon 5700 Lens Error - More people's experiences with lens errors on Nikon cameras:
SD600 Disassembly - Included this as an example of how sand can easily gum up the small gears within your camera. The website also shows a simple method for cleaning these gears.
Finally, I'm curious just how many people actually read this far down into this article. For those people, here are two totally unrelated videos (to this subject) on video editing using freeware. Enjoy!
For camera owners other than A530/A540 experiencing short battery life, or for A530/A540 owners that are not on the below described advisory list, please see this post instead.
Some Canon Powershot A530 and A540 cameras are subject to an advisory recall. It seems that a little hinge spring in the door of the battery compartment can stick out and short the batteries. The end result is very poor battery life, with only a few shots taken before the batteries die. Also the battery door becomes hot.
The good news is that Canon will fix this for free, with free shipping, regardless of the camera's warranty status. Please see this link from Canon.
When contacting Canon, recommend that you print out the above linked advisory and have it in hand. Also, please review the following article concerning a similar Canon advisory for a faulty CCD image sensor.
This should be handled in the exact same way. As stated in the above article, be on guard and respond immediately should you get any feeling that you will be responsible for ANY charges. Repair of your camera should be free and painless.
If this information helps you, please pay it forward, and share this article with others who may be experiencing the same problem. Your help in sharing will be appreciated, and karma will prevail!
The photo recovery software listed here are truly "no-kidding" freeware. Try any of the eight below linked freeware photo recovery software programs. With this software, it's usually no problem at all to recover your lost pictures and videos. There's no catch. They are, no-kidding, FREE, and have been verified by CNET to be safe for your computer.
For those of you with corrupted memory cards, or state that a format is required, please scroll down and see the corrupted card located procedures near the bottom of this article.
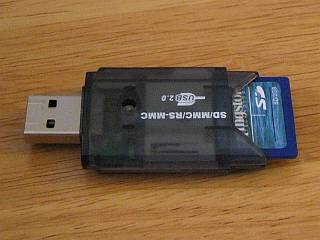
Note that these programs may require the use of a card reader, so think about getting one if you don't have one already. They're VERY inexpensive these days, and may be found on Amazon). What's a card reader? See this other article on card readers from the blog.
Example USB SD Card Reader ( $2 with shipping on Amazon)
If you own a camera, there's no reason not to own one of these!
For Mac Users:One of the listed programs works on both PC's and Mac's (PhotoRec). PhotoRec is an excellent program, and will likely recover your files. If PhotoRec doesn't interest you, then see this blog review of other data recovery freeware for the Mac.
PC Free Recovery Software Performance Comparison
The below listed table outlines the current results of performance comparison of the software listed on this site. This comparison was made using an old 64MB SD card that had been previously erased, formatted, and reused many times. I no longer use this card, and hold onto it only so that I can run head to head comparisons of recovery software. I utilized "deep scan", "surface scan", or "intensive mode" where applicable/selectable, to give each software its best shot at recovery.
And here's my video review of this software.
IMPORTANT point to remember before using any of these programs: Always remember to save your recovered files onto a different memory device than the problem device.This will prevent accidentally overwriting your lost files before the program has had a chance to recover them. For example, if your lost photos are on a SD memory card, set the program to save your recovered files onto your computer's hard drive or a flash thumb drive, and NOT back onto the same memory card.
If you have trouble installing any of these programs with Vista or Windows 7, remember to right-click on their installation file and select "Run as Administrator".
#1: PhotoRec by CGSecurity.org (Windows 2000 though 7, Linux, Mac OS X and many more)
This is absolutely by far the most powerful and most effective freeware photo recovery software that you can find/use. As expected, in the performance comparison it came out on top. It not only recovered all photos, but also their thumbnail files. It also found one additional mp3 file that MiniTool missed. The only drawback of PhotoRec is that it does not have a graphic user interface, and is command line prompted (thus it's portability across many operating systems).
This may scare the average person from using it. They shouldn't be, as it is not too difficult to use. As proof, please see the following tutorial on how to use PhotoRec for photo and video recovery. You'll see that it can be easy. The latest version of the PhotoRec may be downloaded directly from CGSecurity here. The program also comes bundled with another program (TestDisk) which isn't really needed for photo recovery (ignore it if you're only interested in recovering photos from your memory card). But it is a superb program for those of you attempting data recovery of your hard drive or other devices.
Digicam Photo Recovery used to be here. Unfortunately, Digicam has gone payware since when this article was originally listed, and as such has been removed from this article. But this spot is being left open, as there are several other freeware candidates that I plan to include here in the near future.
#2: MiniTool Power Data Recovery Free Edition (Windows 2000, XP, Vista, and 7)
This software came out in 2011, and I have to admit, it is very good. Note that this program allows 1GB of recovery for free, but anything more requires the payware version. I've listed it in this article as 1GB may be satisfactory for most people. Ran a performance comparison of all the listed software, and it came in second, recovering nearly all known deleted images, videos and mp3's on the card. Albeit, it did miss some unneeded thumbnail files and a single mp3 that PhotoRec caught. But it remains one of my favorites as it's almost as powerful as PhotoRec, yet has an excellent GUI that should make it easy for the average person to use. It's also very quick, and relatively easy to use. You may download MiniTool Data Recovery Software from the vendor here. Again 1GB of recovery is free, and any more requires the payware version. And here are simple instructions that I've written showing how to use the program.
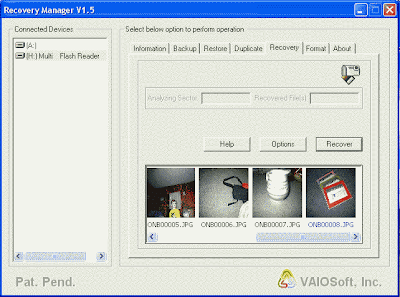
#3: VAIOSoft Recovery Manager (Windows 95 through XP)
If none of the above options worked for you, then here's another fine example in free recovery software. Not as simple as some of the others, but it definitely gets the job done. In fact, it came in third in my performance comparison of recovery software! It was able to recover all the known deleted images on the card as well as 4 known erased mp3's. However, one of the recovered images may have data from a video embedded into it due to its unusally large file size. But still, this program did better than most others evaluated. It's 3.2 megs in size and requires an install. Although CNET says it's good for up to Windows XP, I was able to install and run it on Windows 7. Download VAIOSoft Recovery Software from Yahoo here.Windows 7 useres, remember to right-click and run as administrator for this type of installation. And here are some simple instructions that I've written showing how to use this program.
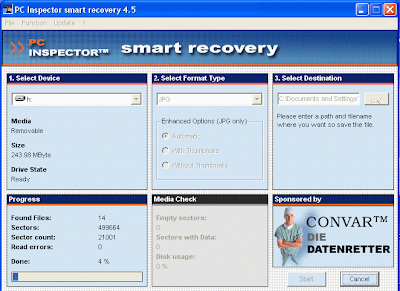
#5: PC Inspector Smart Recovery (Windows 95 through 7)
NOTE Windows 7 users must right-click and select "Run as Administrator".
Had to add this one to the list. This will recover files from flash card reader, hard drive, or just about any drive (but not directly from a camera). It's slower than all of the above BUT and I mean BUT this software is thorough. This one will very likely work in recovering your photos if the others had failed. It was able to recover all known images on the card. However, one of these images obviously has other data embedded with it due to its large file size. The program was not able to recover the known deleted "MOV" video on the card, and does not have mp3 recovery capability. As such, it came in as #5 for still being able to recover all of the known deleted images. You can download PC Inspector Photo Recovery Software from the vendor here. Windows 7 users, remember to right-click and run as administrator for this type of installation. And here's some instructions.
This software package includes a good Wizard interface. The program is good, and will likely recover (Recuva?) your files. But for best results with this program, I found that I needed to select "Switch to Advanced Mode", and then adjust the "Actions" tab settings. Once I did that, previously missing files would suddenly show up with this program. But even with "advanced mode" and running a "Deep Scan", the program was only able to recover 6 of the known 10 images. Although ranked #6, it performs at a tie with Pandora, which also ran a "Surface Scan" to recover the same 6 images as Recuva did. You may download Recuva from its vendor here. And here are some instructions for its use.
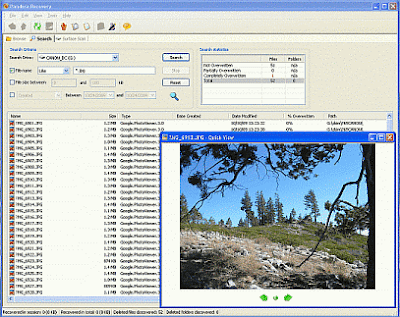
#7: Pandora Recovery (Windows 2000, XP, and Vista only)
This one is also good and works under Vista too, which is always a plus. You can do intensive deep scans for those deleted photos from long ago (though it will take time, results will vary), or you can do simple scans for those easily recovered recently deleted files. This tied with Pandora, as it was only able to recover 6 of the 10 images on the card. You can read about Pandora's features here. And you can download Pandora Recovery from SoftPedia here.
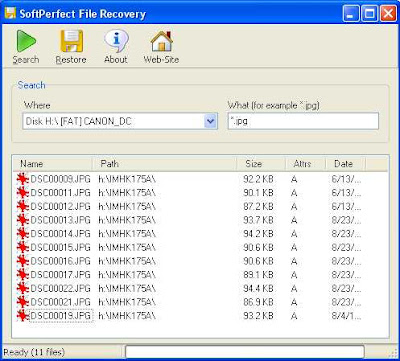
#8: SoftPerfect File Recovery (Windows 95 through Vista)
Ahhh, the beauty of simplicity (can work with most OS)! This one is very tiny (276kb) and recovers any file type by specifying searches for "*.jpg", "*.avi", "*.mov" etc... It's very fast too! It's a single executable file that does not require installation. Controls are simple and minimal. Manually highlight the files that are to be recovered, and right click to save them to a folder. Unfortunately, this program seems to work best (and maybe only) for recently deleted files. Also unfortunately, it wasn't able to recover any of the photos on the 64MB test card, possibly because I had done a quick format in the past with this card. As such, it may not be capable of recovery for anything more than simple deleted files. But for most people who just accidentally hit the delete button, that's all they may need. So it still may be of use, and I keep it listed here. Download SoftPerfect File Recovery from its vendor here.
Now that you know how, go recover those "lost" pics of Aunt Lucy! Also, please remember to vote in the poll in the right column on which software worked best.
or For Memory Cards that state that formatting is required.
The following describes procedures for those with corrupted cards. Most of you should not need to conduct these procedures. These procedure are intended only for people with cards that are not being recognized by either the computer or the camera, with either stating that a format of the card is required. If you do conduct these procedures, please leave a comment stating how they worked (or did not) work for you. These procedures are new, and I'm still modifying them for this article:
It is common for a memory card to become corrupted. This usually occurs if the card had never been formatted prior to use in your camera. It may work fine at first, but with time, as many files are added, problems with the card will inevitably crop up. There are several other reasons for a card to corrupt, but the above is the most common.
When a card corrupts, files may start to disappear that you know are on the card. Sometimes the card may also become totally unrecognizable by both your camera and computer. You may receive notification from both that the card requires formatting. You may become alarmed that if you do format the card, you might not be able to recover your pictures.
In actuality, it all depends on the type of format that you conduct. A FAT32 "Quick Format" conducted on your PC will not overwrite the data on the card. Thus recovery is still possible using the recovery software listed in this article. Similarly, if your camera allows you to DESELECT "low level" format, then you should also be able to recover your files after a non-low level format (CAUTION: "low level" format WILL overwrite your files. Stated again, it's important to deselect or uncheck "low level" format in the camera menus).
The following illustrates the steps to take for either your PC or your camera (A Canon is used for this example) to conduct a format that will still allow you to recover your files. Before proceeding, if you're using a SD card, ensure that your memory card's write switch is in its upper "unlocked" position. Then insert the card into your camera, or your computer (using a card reader).
Lock Switch in Upper "Unlocked" Position
Camera Quick Format
If using a camera, find the format menu in your camera. It's usually in the "tools" or "settings" menu. If unsure where its at, look for a selection that states you cards memory size and select it.
Camera Format Menu Selection
Look in the camera's menu to see if it has the ability to deselect (uncheck) "low level" format. Uncheck this selection, and then select and conduct a format. If your menu does not allow you to deselect "low level", then look for a "Quick Format" option. If your camera's menu doesn't have either option, it might be better to skip this step (avoiding an inadvertent low level format) and instead proceed to quick formatting by using your PC. Once your camera completes its quick format, attempt to recover your photos using any of the software listed above.
Low Level Format shown UNCHECKED in menu
PC Quick Format
Your card can also be quick formatted in your PC. But after you've recovered your photos, you should still format the card in your camera to prevent this from happening again. Place your card in a card reader, and if using a USB reader, insert the card and reader into your PC. Wait for the reader to be recognized by your PC. Once your reader is recognized, right click on its selection in "My Computer" or "Computer", and select format.
Once the format menu comes up, double check that the card reader is actually selected in the upper bar of the menu, and that you didn't accidentally select one of your other drives (that would be very bad). Once you verify that the card reader is showing in the menu, select "Quick Format" by checking the box in the menu, and then press start.
Quick Format Box "CHECKED"
Once the quick format is completed, you should be able to directly proceed to recover your files using the card in the reader with the software listed above. AFTER you've successfully recovered your photos/videos, remember to format the card once again IN YOUR CAMERA using the camera's format feature. This may help prevent what just happened to you from reoccurring again in the future.
For that camera that died, here are some non-intrusive simple fixes that you should try before throwing in the towel. Copied this first post from somewhere. It was a fix for a Canon A520, but am not sure if it would work for other cameras with the same problem? For those of you with a camera that will not power up or turn on, especially if this occurred after a power interruption with your lens extended, please give it a try. If you do, please leave a comment on specifics like your camera make/model, and whether it worked for you or not.
"DEAD CAMERA, LENS OPEN-If the batteries run down completely while the camera is still open, it may not start up again when new batteries are installed. But if you remove the memory card, then install the new batteries, when you turn it on it should come back to life. Error E30 means you don't have a memory card installed, so turn it off, slip in the SD card and turn it on one last time."
OK, so the above didn't work. Next thing to look at are the batteries themselves. Are you using alkaline batteries, or worse yet those "Super Heavy Duty" batteries? If so, betcha we've just discovered your problem. Alkaline and regular "super heavy duty" batteries just don't have the power for more than a few pics in a digital camera. Some may even have problems just powering startup of the camera. It doesn't matter if they're new, and right out of the package. Digital cameras for the most part should only be used with rechargeable NiMH batteries (if you still have your instruction manual, open it to the "batteries" section. Pretty sure you'll see a statement similar to what I've just said). Most retailers sell NiMH batteries for around $7 for a package of four (about $15-19 for the batteries with charger). Keep in mind they'll save you big bucks in the long run over alkalines, AND they'll last for at least 100 pictures per charge (and probably many many more). You'll be very pleased with their performance, and may slap yourself for not buying them sooner. When at the store, look on the package for a power rating of at least 2500 mah.
OK, so maybe those newfangled batteries didn't fix your camera, don't give up just yet. The next thing to check is that your batteries are actually making contact with the battery posts, and that these posts are clean. If not, bend the posts up/down a little, and maybe clean them with a little rubbing alcohol on a Q-tip.
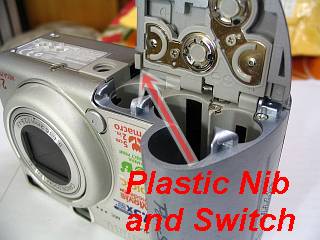
The next thing to try is examine both the battery and flash card door. There's usually a little switch on both doors (note some SD card doors do not have this switch) that activates when the doors are closed. If they don't, the camera won't start to prevent damage to the flash card or camera startup sequence. For most cameras its usually a little piece of plastic on the door that pushes in on a pin switch when the door is closed. Closely examine both doors to try to identify these switches. A lot of times that little plastic nib wears down or breaks off, but can easily be jury rigged with a small glued-on replacement.
Examples of Nibs and Pin Switches
If you've tried all of the above and still no luck, the problem is then likely to be internal to the camera. Am planning on posting sometime in the future some likely things to check, hopefully with a pictoral guide. One example would be that if your camera uses Compact Flash, check to make sure all pins are present and aligned in the card slot (if bent, simply unbend/straighten them with a skinny "jewelers" screwdriver, then insert the flash card for final realignment).
As before, if one of these simple fixes worked in your particular case, please leave a comment on your camera's make, and which fix worked.
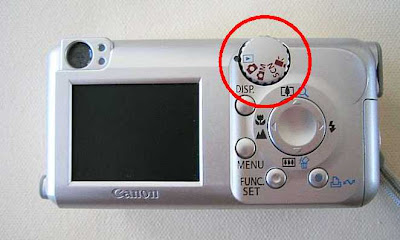
The "Mode Dial" enables the camera to select different modes of operation. Rear mounted types, such as those seen in the example picture, are of very simple design. Top mounted types are also of similar design, but they are usually much harder to access. Mode dials should operate for a very long time due to their simplicity. Yet some may become inoperative for a variety of causes (dirt fouling, impact damage, etc...). When this occurs, it may be necessary to actually open up the camera case to correct this problem. As such, please consider this a repair that requires some electrical background and knowledge, and should not be conducted by anyone unfamiliar with basic electrical components and safety precautions.
Mode Dial
Before downloading the following repair guide, please first review this important warning concerning the possibility of SEVERE electrical shock from the camera's flash capacitor, and how to mitigate it:
Also the usual warning of “Follow these procedures at your own risk. These procedures should only be considered as a last resort on a broken camera with an expired warranty. I take no responsibility should you damage your camera in following these steps. Also note that there is some danger of electrical shock from the camera's flash capacitor. I also take no responsibility if you zap yourself while following these procedures.” Here's the repair guide download link:
Any repair that requires opening up the camera case requires some electrical background and knowledge, and should not be conducted by anyone unfamiliar with basic electrical components and safety precautions. If you must open up your camera in an attempt to repair it, it is very important that you understand that there is some risk of SEVERE electrical shock. All digital cameras contain a flash capacitor. This device stores quite a bit of electrical energy from the camera's batteries. This energy is utilized to power the camera's flash. The device itself looks a little like a battery, and in turn draws its power from the camera's batteries. In order to work on your camera, it will be necessary to safely drain the capacitor of any residual charge it may have.
Flash Capacitor
The following link is downloadable procedures for safely discharging the flash capacitor to greatly reduce the risk of electrical shock. Before downloading, the usual warning of “Follow these procedures at your own risk. These procedures should only be considered as a last resort on a broken camera with an expired warranty. I take no responsibility should you damage your camera in following these steps. Also note that there is some danger of electrical shock. I also take no responsibility if you accidentally zap yourself while following these procedures.” Here's the link to the procedures:
It is necessary to actually open up the camera case to fix a broken camera LCD screen. As such, please consider that these repairs require some electrical background and knowledge, and should not be conducted by anyone unfamiliar with basic electrical components and safety precautions. Before proceeding, it is important to first read this WARNING concerning the possibility of SEVERE electrical shock from the flash capacitor should you decide to open the case of your camera.
The following link outlines repair or replacement of the fairly common problem of broken, cracked, or shattered digital camera LCD screens, including rotatable ones. These are not my own guides, but wanted to share them with all (hope this is ok Andy?):
Photography on the Net (Canon) forum of digital camera LCD screen replacement. Recommend scanning these posts for some background info prior to attempting any repair yourself:
By the way, the above YouTube video is by Zweige9. He is a very prolific videographer of LCD repair. If your camera's model is not covered here in my blog, you might want to peruse his videos on YouTube:
Here's a couple great pictorials on repairing the LCD screen of a Canon Powershot SD300 (note these procedures are also applicable to SD200 / SD300 / SD400 as the LCD screens in these three models (and ONLY these three) are interchangeable):
(Updated March 23, 2011) Similar to Canon, Sony at one time promised to REPAIR FOR FREE its cameras experiencing symptoms of a defective CCD under their recall advisory. THIS INCLUDED FREE SHIPPING. Some symptoms of a defective CCD include distorted images or abnormal colors, scratchy purple lines, blank or black pictures, and/or black videos with good sound being recorded on the camera's flash card. You may suspect that the camera's shutter is not opening, but this is not the case. Digital still camera models that are affected by this problem are extensive, and include:
The following was the verbage of the original Service Advisory:
"Based on the information provided, your product may be affected by the CCD image sensor issue and needs to be sent in for evaluation and possible repair. Sony will repair your product, free of charge, where the issue is caused by the image sensor device provided the failure is not due to abuse, misuse or neglect. Sony will also cover the cost of shipping and handling from and to addresses within the United States and US Territories for service to correct this issue."
(UPDATE June 2010): Sony has abandoned the free repair of all cameras, with the exception of T3 and the T33. For these two specific cameras, Sony will offer the free repair until May 31, 2011, at that point the free repair offer expires. Shipping is not free for this repair. Please see this Sony link for the details.
By the way, If you have a Konica Minolta digital camera experiencing these issues, Sony at one time would have also fixed this for your for free. However this offer was for a very short duration:
(UPDATE September 6, 2008: A reader has reported that the following link no longer works, and that Sony has abandoned their free repair of the Konica Minolta cameras with the defective Sony imager. The reader also stated that as a result that he will no longer consider Sony products. Given the quality assurance problems Sony has been encountering lately, I don't blame him. Just my opinion. Also IMO, ALL of these cameras should have been recalled and repaired in the first place as inevitable failure of the defective imager is HIGHLY likely. To have repaired them on a case by case basis, with a program limited duration, has inevitably led to the above consumer's experience and response. Shouldn't a camera that originally cost a few hundred dollars really be expected to last more than just a few years? ):
The Dimage models that Sony was accepting for the recall repair were: Dimage 7HI, 7I, A1, Xi, F300, XT, X20, S414.
And finally, this is a WORLDWIDE advisory recall. You may need to do some google searching to find the advisory notice for your country. Google the words "Sony", "advisory", your camera's model number, and your country. Look for the official Sony website for your country with its related advisory in the Google results that come up.
Hope this helps some of you out there. Please remember to come back and leave a comment below on how things went. We're all curious, and your feedback may help others!
This problem may be corrected by Canon for free if you suffer the above symptoms. But before reading further, first verify that you didn't just accidentally turn off the LCD. To check, turn the camera on and press the "DISPLAY" or "DISP" button once. One other thing to check is that black pictures can sometimes be caused by a stuck shutter. Continue reading below, but if your camera is not on the list of affected cameras, please see this other article for self-fixing a stuck shutter.
Potential symptoms may also include purple scratchy lines showing up on the LCD monitor and the camera's pictures. Other reported symptoms may be extremely distorted images (one reader likened them to the movie "Grudge"). Or blank or black pictures or black videos with good sound being recorded on the camera's flash card. You may suspect that the camera's shutter is not opening, but this is not the case. Note that the camera's menu functions should show up without any problem.
A large batch of potentially faulty CCD image sensors (from another vendor who shall remain nameless) were installed on a large number of Canon cameras over the space of a few years. The sensors may go bad prematurely with time, especially if you live in humid areas. A big thumbs up to Canon in that they recognized this problem, and are willing to fix your camera for free if it is experiencing CCD problem symptoms, especially for the free shipping and handling both ways :-). Under the recall advisory this is regardless of the cameras warranty status! I recently got an old A300 fixed this way. They are not going to ask for receipts or any of that.
Please note that your camera must be experiencing these symptoms due to a faulty CCD, and not due to other problems. If the problem is due to your dropping the camera, you might be out of luck. Note that they're going to look for dings and dents. They also are not going to repair your camera just to change out the sensor. If your camera is working fine, they don't need to (and won't) fix it.
The list of problem digital still cameras include: A40, A60, A70, A75, A80, A85, A95, A300, A310,
S1 IS, S60,
S200, S230, S330, S400, S410, S500, SD100, SD110,
IXUS V2, V3, 300, 400, 430, 500, II, IIs,
IXY Digital 200a, 300a, 320, 400, 450, 500, 30, 30a
Canon has posted on their website that they are gradually phasing out the free repair for SPECIFIC CAMERA MODELS. The phase out schedule for the specific cameras is as follows (and may also be seen here):
Note that many cameras on the advisory list are NOT mentioned in the phase-out schedule, and they are STILL ELIGIBLE FOR FREE REPAIR under the advisory after 3/31/2011. These include A75, A85, A95, S1 IS, S60, s410, S500, SD100, SD110, and their IXUS / IXY counterparts.
END UPDATE
Note that for other countries, go to http://www.canon.com/ and click on "Support" in the left column. Then click on your region on the map and select your country. Go to the Digital Camera "Support" page for your country, and find the page describing support for your specific camera model. Your country's CCD advisory should be included somewhere on this page. If not, contact the official Canon digital camera support office listed on the Canon website, as they will be knowledgeable on the advisory. Again only contact the "official" Canon support centers listed on the website. If you go anywhere else, they may charge you for the repair, and merely ship the camera to Canon for the free repair.
This is a worldwide advisory, and as you can see in the comments below, there's yet to be a country that sells Canon products that has not honored this advisory. Unfortunately, some country's websites are poorly designed, and make it very hard to find their advisory (as example, this link may help save some time searching for those living in Australia).
For those in the U.S. or Canada (other country's procedures may vary slightly), you will be directed to call 1-800-828-4040 for further assistance. Or if you wish, you may also contact Canon via email at CareCenter@cits.canon.com. Make sure you print out the above advisory and have it in hand when speaking to the customer service representative. State the problem you're experiencing with the camera. If for any reason it starts to sound like they want you to pay for shipping or repairs, MAKE SURE that you let them know that you are aware of the advisory for your camera, and quote the following paragraph from the advisory:
"Effective immediately, and regardless of warranty status, Canon will repair, free of charge, the products listed above exhibiting the above-mentioned malfunction if Canon determines that the malfunction is caused by the CCD image sensor. Canon will also cover the cost of shipping and handling in connection with this repair."
You should receive several emails from Canon. One includes a short repair evaluation form that you'll need to include with the camera, along with a free UPS shipping label that you'll print out and tape to the camera's shipping box. In addition to Canon's repair form, make sure you print out a copy of the advisory and include it in the package. Also include a short note stating that you're aware of the advisory, and that you're submitting the camera for free repair as per the advisory. Just drop the box off at any UPS drop off point.
If instead of the above you receive an email that infers that it's your responsibility to arrange shipping and/or pay for the repair, REPLY BACK IMMEDIATELY again quoting the above paragraph from the advisory, and also include the above link to the advisory in your email. (Note, free shipping applies for the U.S.. Other countries may vary on shipping arrangements/payment for this advisory).
One important note. Some readers have been reporting that Canon had offered them as a replacement a refurbished "upgrade" camera, BUT at an inflated price. Not sure what this is about, but if this happens, recommend turning them down. The upgrades that have been reported seem to be older model cameras at much higher prices than the going price on ebay. Recommend pushing for and demanding the advisory dictated free repair with free shipping on your old camera. If offered a replacement, it should also be free.
Another reminder for you owners of cameras that are not listed in the advisory list of problem cameras, including other non-Canon cameras. If your camera is not listed in the above list of problem cameras AND it is taking black pictures, there's a good chance that your camera is experiencing a stuck shutter. Don't fret, as there are some simple fixes for this, albeit it may be a temporary fix. Please see this article instead for some tips on how to unstick that shutter.
Hope this helps some of you out there. Canon really does make quality cameras and stand behind their products. Please remember to come back and leave a comment below on how things went. We're all curious, and your feedback may help others!
And finally, the following videos may help you understand what you're getting with this free CCD repair. An SD100 (IXUS II) is the camera being repaired. Don't try this at home (I know I won't):
A stuck automatic lens cover is a fairly common problem, but it is normally easy to fix. A single grain of sand jamming the cover mechanism is normally the culprit, and you want to try to dislodge it: 1) Try blowing lots of compressed air around the lens cover to clean the mechanism. Or use a hair dryer for a few seconds (don't want to heat up the camera). Use no heat mode if possible. 2) Slide a thin strip of paper between the lens cover shutters and the outer support ring. Work it around 360 degres to clear out any debris that may be in there. 3) With the lens barrel extended and pointed downward, tap the lens barrel with a pencil while you extend and retract the lens by powering the camera on and off. Repeat the above three steps several times. If repeated tries don't work (keeping in mind that it usually does), it then may be necessary to open the lens barrel to access the lens cover mechanism. But before attempting that, first read through the user's comments below for additional non-invasive tips that may work for your particular situation. Especially pay attention to Jeff's tip, several people have had success with it.
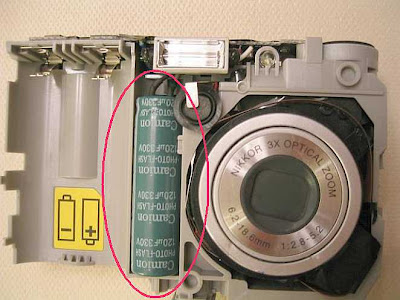
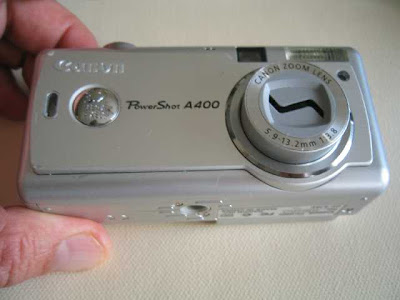
The lens cover mechanism is usually accessible for many cameras without needing to open up the camera case. Before starting, a reminder that I hold no responsibility should you damage your camera or worse. These repairs are intended as last resorts on expired warranty cameras that would otherwise be tossed. In the example outlined in the following link, we'll fix an inoperative lens cover on an old Canon A400:
And here's two excellent tutorials for those with slightly more complex four leave lens covers. A Canon A530 and a Canon A1000 are used as examples (hope you don't mind me including the links xscrewdriver).
And finally, found this fix that was particular for the Panasonic Lumix DMC-TZ3 camera. It's simple enough and worth giving a quick try even if your camera is not a Panasonic:
Please first consider that any repair that involves opening up the camera case will also require some electrical background and knowledge. Camera disassemblyshould not be attempted by anyone unfamiliar with basic electrical components and safety precautions. Before downloading or following any of these guides, please first read the following post concerning the risk of SEVERE flash capacitor electrical shock, and how to mitigate it when working on the exposed internal components of your camera:
That said, the usual warning if you decide to proceed: "Follow these procedures at your own risk. These procedures should only be considered as a last resort on a broken camera with an expired warranty. I take no responsibility should you damage your camera in following these steps. Also note that there is some danger of electrical shock. I also take no responsibility if you accidentally zap yourself while following any of these procedures.”
Disassembly guides for cameras by manufacturer and model include:
Let's use this post to share websites that provide some instruction on digital photography. I'll start off with a couple posts of great websites that will help you take photos that you didn't think possible with your camera. Please post others that you know of and recommend in the comments section, and I'll include them here in the main post:
I'll start this blog off with disassembly/repair of the Nikon Coolpix L10 camera. Before downloading or attempting to follow these procedures, please consider that these procedures require some electrical background and knowledge, and should not be conducted by anyone unfamiliar with basic electrical components and safety precautions. Please also read the following post concerning the risk of SEVERE flash capacitor electrical shock, and how to mitigate it when working on the exposed internal components of your camera:
The following links to a small pdf file that outlines the steps to dissect the Nikon L10. They were developed by personal disassembly of the camera, and are not recognized or authorized by Nikon. Follow these procedures at your own risk. These procedures should only be considered as a last resort on a broken camera with an expired warranty. I take no responsibility should you damage your camera in following these steps. Also want to restate that there is some danger of severe electrical shock from the camera's flash capacitor. I also take no responsibility if you zap yourself while following these procedures. Here's the link:
THE BEST WAY TO SHOW YOUR APPRECIATION is to share this resource with others who may be experiencing the same problem that you had. You may have seen them in the search that led you here. If in your surfing of the internet you come across others experiencing similar problems with their camera, please be kind and direct them to this site.
Thanks, CR
Why this Blog?
PLEASE READ THIS ! Oh no! You've dropped your digital camera. And it's out of warranty. And repair costs more than the camera is worth. What to do short of tossing the camera (or selling on ebay)? Well, believe it or not the average person has a good chance of diy fixing that camera themselves. All they'll need for most cases is some patience, and a little background knowledge. The intent of the posts on this blog are to help provide that knowledge.
But now for the WARNINGS! Many of the repairs posted here should only be considered as a last resort for a broken camera that would otherwise be considered for disposal. Also please consider those repairs that require removing the camera case to also require some electrical background and knowledge, and should not be attempted by anyone unfamiliar with basic electrical components and safety precautions.
Make sure you read this post and are aware of the potential DANGER OF SEVERE ELECTRICAL SHOCK should you decide to proceed with a "do it yourself" repair that involves removing the camera case.
WHAT YOU READ HERE IS NOT PROFESSIONAL ADVICE. Most of the posts and comments in this blog come from amateur repair hobbyists (INCLUDING MYSELF). Take the advice with a grain of salt. YOU MAY ACTUALLY MAKE MATTERS WORSE by following what you read here. Many of these repairs will almost certainly VOID YOUR CAMERA'S WARRANTY.
It's ultimately YOUR RESPONSIBILITY should YOU DECIDE to try some of the repairs posted here.